Suppose you went on one of the most important trips of your life and came back with hundreds of photos and videos — memories you can never recreate. But a few days later, your iPhone is gone. Lost, stolen, or simply broken. And with it, every photo, every message, every password — all gone.
The worst part? It takes less than 5 minutes to prevent that disaster.
In this guide, I’ll show you exactly how to backup your iPhone using three simple methods — iCloud, Mac, and Windows PC — so your data is always protected, no matter what happens.
What Is an iPhone Backup?
An iPhone backup is a secure copy of the important data stored on your device. It allows you to restore your apps, photos, messages, settings, and preferences if your iPhone is ever lost, damaged, reset, or replaced.
Think of it as a digital safety net. Most people don’t think about backups until something goes wrong — and by then, it’s usually too late.
A proper backup can save:
- Years of photos and videos
- WhatsApp chats and messages
- Contacts and saved notes
- App settings and home screen layout
- Passwords and Wi-Fi settings
- Health and fitness data
According to Apple, millions of users restore backups every year while setting up new iPhones or recovering devices after accidental damage. That alone tells you how important backups really are.
The good news? Apple has made the process extremely simple, and once you set it up correctly, most backups happen automatically in the background.
Why Backing Up Your iPhone Is More Important Than Ever
Modern smartphones contain almost every part of our daily life. Your banking apps, personal photos, office documents, payment methods, travel bookings, and even two-factor authentication codes all live inside your iPhone.
Losing that data can create serious problems.
Here are some common situations where backups become lifesavers:
- Your iPhone gets stolen
- Your device stops turning on
- A software update fails
- Your screen breaks completely
- You accidentally delete important photos
- Your iPhone gets stuck in recovery mode
- You switch to a new iPhone
Apple’s official support pages repeatedly recommend maintaining regular backups before updating iOS or changing devices. Even Apple technicians often ask users whether they have a recent backup before troubleshooting major problems.
Simply put, backups are no longer optional.
3 Ways to Backup Your iPhone
Apple officially provides three methods to backup your iPhone:
- iCloud Backup
- Backup to Mac
- Backup to Windows PC
Each method works differently and serves different types of users.
| Method | Best For | Internet Needed | Storage Type |
| iCloud | Most users | Yes | Cloud |
| Mac Backup | Mac users with large storage | No | Local |
| Windows Backup | PC users | No | Local |
Let’s go through each method properly.
Method 1: How to Backup iPhone to iCloud
iCloud Backup is the easiest and most convenient method for most people. Once enabled, your iPhone automatically backs itself up every day without requiring cables or manual effort.
This is the method Apple pushes most heavily because it works silently in the background.
Before You Start
Make sure:
- Your iPhone is connected to Wi-Fi
- Battery is above 20% or plugged into charging
- You have enough iCloud storage available
Apple provides only 5 GB of free iCloud storage, which fills up quickly if you have lots of photos or videos.
Current iCloud+ plans include:
| Plan | Storage | Monthly Price |
| Free | 5 GB | $0 |
| iCloud+ | 50 GB | $0.99 |
| iCloud+ | 200 GB | $2.99 |
| iCloud+ | 2 TB | $9.99 |
| iCloud+ | 6 TB | $29.99 |
| iCloud+ | 12 TB | $59.99 |
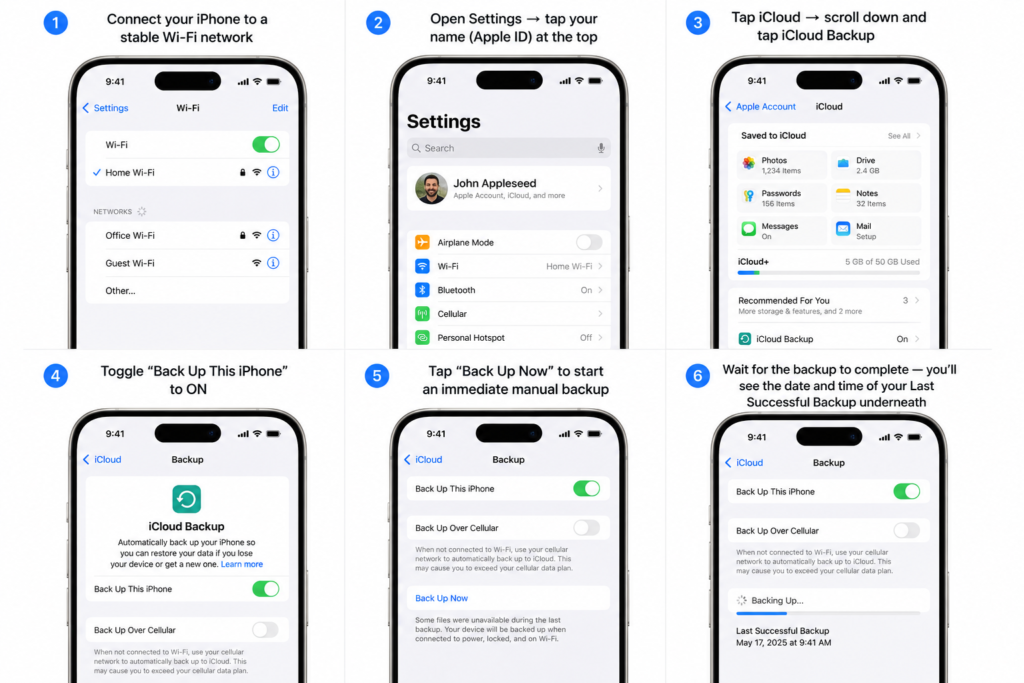
Steps to Backup iPhone to iCloud
- Connect your iPhone to a stable Wi-Fi network
- Open Settings → tap your name (Apple ID) at the top
- Tap iCloud → scroll down and tap iCloud Backup
- Toggle “Back Up This iPhone” to ON
- Tap “Back Up Now” to start an immediate manual backup
- Wait for the backup to complete — you’ll see the date and time of your Last Successful Backup underneath
How Automatic iCloud Backup Works
Once enabled, your iPhone automatically creates backups daily when:
- Your iPhone is charging
- Connected to Wi-Fi
- Screen is locked
- Connected to the internet
This means you usually never have to think about backups again.
However, if your iCloud storage becomes full, backups stop automatically. That’s why checking your backup status once a month is a smart habit.
Advantages of iCloud Backup
Wireless Convenience
No cable or computer needed.
Automatic Daily Backups
Everything happens in the background.
Easy Device Migration
When setting up a new iPhone, Apple allows direct restoration from iCloud backup.
Works Anywhere
As long as you have internet access, your backup remains accessible.
Disadvantages of iCloud Backup
Limited Free Storage
5 GB is usually not enough for modern users.
Slower First Backup
Large photo libraries may take hours.
Internet Dependent
Without stable Wi-Fi, backups may fail.
Method 2: How to Backup iPhone to a Mac
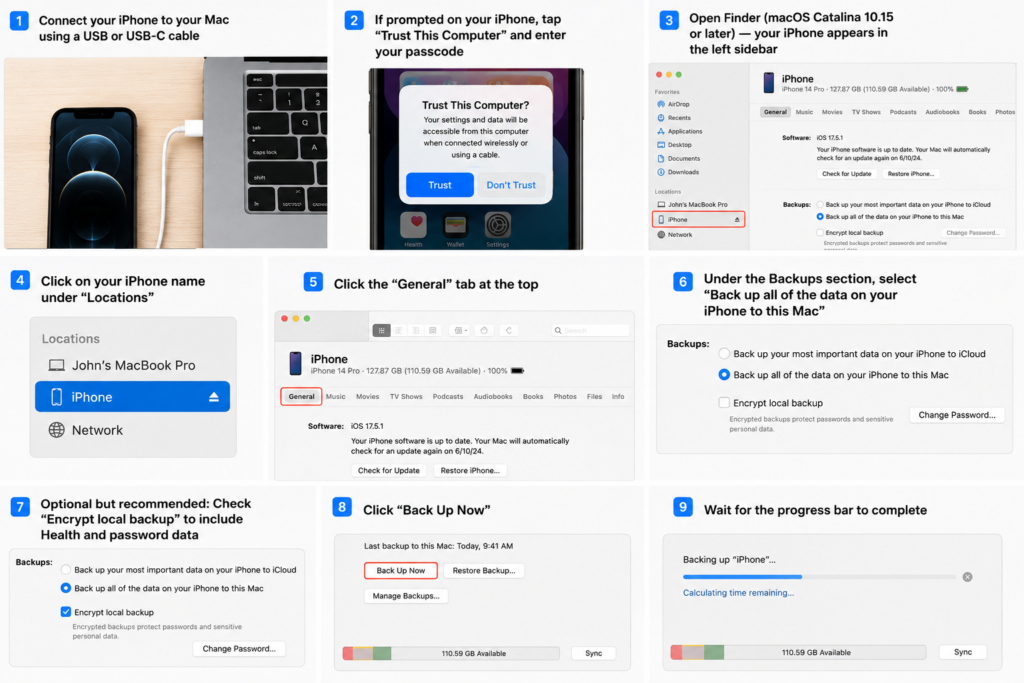
Steps to Backup iPhone to Mac
- Connect your iPhone to your Mac using a USB or USB-C cable
- If prompted on your iPhone, tap “Trust This Computer” and enter your passcode
- Open Finder (macOS Catalina 10.15 or later) — your iPhone will appear in the left sidebar under “Locations”
- Click on your iPhone name
- Click the “General” tab at the top
- Under the Backups section, select “Back up all of the data on your iPhone to this Mac”
- (Optional but highly recommended) Check “Encrypt local backup” — this ensures your Health data, saved passwords, and Wi-Fi settings are also included in the backup
- Click “Back Up Now”
- Wait for the progress bar to complete before disconnecting your phone
Note: Since macOS Catalina (2019), Apple removed iTunes from Mac. Finder is now the built-in tool for iPhone backups. If you’re on an older Mac running macOS Mojave or earlier, use iTunes instead — the steps are almost identical.
Why Encrypted Backups Matter
Many people skip encrypted backups without realizing what they lose.
Without encryption, your backup does NOT include:
- Saved passwords
- Wi-Fi settings
- Health data
- Website login credentials
- Screen Time settings
Encrypted backups are protected with a password and provide a much more complete restore experience.
Apple itself recommends encrypted backups for maximum data preservation.
Advantages of Mac Backup
Faster Than iCloud
USB backups are usually much quicker.
No Monthly Storage Cost
No need to purchase cloud storage.
Complete Offline Backup
Perfect for users who prefer local storage.
Better for Large Files
Huge photo libraries backup more reliably.
Disadvantages of Mac Backup
Requires a Cable
Unlike iCloud, it is not fully wireless.
Manual Process
Unless you remember regularly, backups may become outdated.
Method 3: How to Backup iPhone to a Windows PC
Windows users can also create full iPhone backups using either:
- iTunes (Windows 10)
- Apple Devices app (Windows 11)
Apple has slowly started replacing iTunes with dedicated apps on Windows 11, making the process cleaner and simpler.
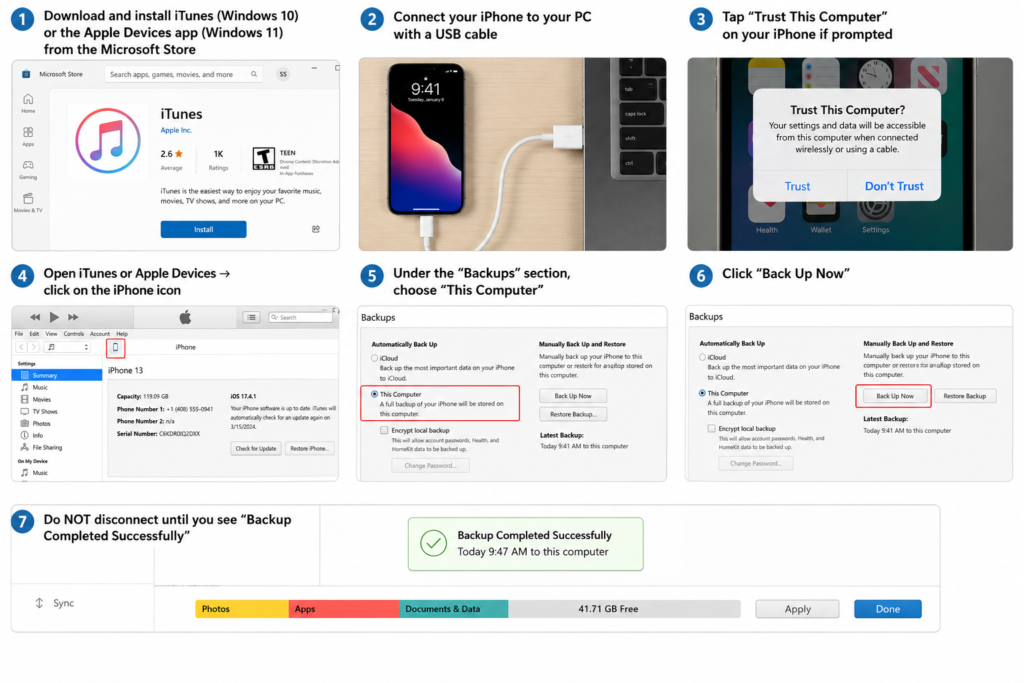
Steps to Backup iPhone to Windows PC
- Download and install iTunes (Windows 10) or the Apple Devices app (Windows 11) from the Microsoft Store
- Connect your iPhone to your PC with a USB cable
- If prompted on your iPhone, tap “Trust This Computer” and enter your passcode
- Open iTunes or Apple Devices → click on the iPhone icon near the top left
- Under the “Backups” section, select “This Computer”
- Click “Back Up Now”
- Do NOT disconnect your iPhone until you see “Backup Completed” — disconnecting early can corrupt the backup file
Note: If you’re on Windows 11, the Apple Devices app is cleaner and easier to use. If your iPhone doesn’t appear, try a different cable or USB port, and make sure iTunes or Apple Devices is fully updated.
Common Windows Backup Problems
Windows backups sometimes fail because of:
- Faulty USB cables
- Outdated iTunes version
- Driver issues
- Disabled Apple services
- USB port problems
If your iPhone does not appear:
- Restart both devices
- Try another cable
- Use another USB port
- Update iTunes or Apple Devices app
Should You Use iCloud or Computer Backup?
This depends entirely on your usage style.
Use iCloud If:
- You prefer automation
- You dislike cables
- You want seamless backups
- You upgrade iPhones frequently
Use Computer Backup If:
- You store huge amounts of data
- You prefer offline backups
- You want faster restore speeds
- You don’t want monthly storage fees
Best Option?
Many experienced users actually use BOTH.
Daily iCloud backups combined with monthly computer backups create an excellent safety system.
What Does an iPhone Backup Include?
Many users assume backups include absolutely everything. That’s not entirely true.
Here’s what typically gets included.
Included in Backup
- App data
- Messages
- Device settings
- Home screen layout
- Photos and videos
- Ringtones
- Apple Watch backups
- Health data (encrypted backups only)
- Passwords (encrypted backups only)
NOT Included in Backup
According to Apple’s support documentation:
- Apps themselves
- Apple Pay information
- Face ID and Touch ID settings
- Content synced from Finder or iTunes
- Data already synced with iCloud
- Mail data
- iCloud Photos content
This is because many items sync separately through iCloud services.
How Long Does an iPhone Backup Take?
There’s no universal answer because backup time depends on:
- Internet speed
- Storage size
- Number of photos/videos
- USB speed
- Device condition
Typical estimates:
| Backup Type | Average Time |
| First iCloud Backup | 30 mins – several hours |
| Regular iCloud Backup | 5–20 mins |
| Computer Backup | 10–45 mins |
First-time backups always take the longest.
Afterward, Apple only uploads changed data, making future backups significantly faster.
How to Check If Your Backup Was Successful
Never assume the process worked correctly.
Always verify your latest backup.
Check iCloud Backup
- Open Settings
- Tap your name
- Tap iCloud
- Tap iCloud Backup
- Check the date under: Last Successful Backup
Check Mac or Windows Backup
- Open Finder, iTunes, or Apple Devices
- Select your iPhone
- Look under: Latest Backup
If the timestamp is recent, your backup worked successfully.
Common iPhone Backup Problems and Fixes
“iCloud Backup Failed”
Possible causes:
- Weak Wi-Fi
- Low storage
- Apple server issues
Fixes:
- Restart Wi-Fi
- Free up iCloud space
- Retry later
- Restart your iPhone
“Not Enough iCloud Storage”
This is extremely common.
Fixes:
- Delete old backups
- Remove unnecessary files
- Upgrade iCloud+
“Backup Taking Too Long”
Large video files are usually the reason.
Fixes:
- Use faster Wi-Fi
- Backup overnight
- Remove unnecessary media temporarily
“iPhone Not Showing on Computer”
Fixes:
- Unlock your iPhone
- Tap Trust
- Change cable
- Update software
- Restart devices
Important Backup Tips Most People Ignore
Backup Before Every iOS Update
This is one of the smartest habits you can build.
Even though Apple updates are generally stable, failures still happen occasionally.
A fresh backup ensures you can restore everything immediately.
Keep Two Backups
Relying on a single backup method is risky.
Cloud issues, corrupted files, or accidental deletions can happen.
Using both iCloud and local backups provides extra protection.
Enable Encrypted Backups
Without encryption, your backup is incomplete.
This single setting preserves passwords, health records, and important account data.
Check Backup Dates Monthly
Many people assume automatic backups are still working when they actually stopped months ago because of full storage.
Checking once monthly takes less than a minute.
Is iCloud Backup Safe?
Yes.
Apple uses encryption to protect iCloud backups during transmission and storage.
Additionally, Apple has expanded Advanced Data Protection features in many regions, providing stronger end-to-end encryption for users who enable it.
Still, no digital system is perfect. That’s another reason why maintaining an additional local backup is a smart idea.
Should You Backup Photos Separately?
If your photos are extremely important, the answer is yes.
Even though iCloud Photos works well, many professionals maintain secondary copies using:
- External hard drives
- Google Photos
- NAS storage systems
- SSD backups
Photos are usually the most emotionally valuable part of any iPhone.
Having multiple copies is never a bad idea.
Conclusion
Ask yourself one honest question:
If your iPhone disappeared tomorrow, how much of your life would disappear with it?
Your photos, messages, passwords, notes, office files, payment apps, and memories all live inside that one device. And while Apple has made recovery easier than ever, none of it matters if you never created a backup in the first place.
The good news is that protecting your data takes only a few minutes.
Whether you choose iCloud, a Mac backup, or a Windows PC backup, the important thing is simple — start today, not after something goes wrong.
Because the people who regret not backing up their iPhone almost always say the same thing:
“I thought it would never happen to me.”
Quick FAQ
How often should I backup my iPhone?
Ideally, every day. Automatic iCloud backup already does this for most users.
If you use computer backups, once a week is a good practice.
Can I backup my iPhone without Wi-Fi?
Yes, using a Mac or Windows PC through USB.
However, iCloud backup requires internet access.
Does backing up delete anything from my iPhone?
No.
A backup simply creates a copy of your data.
Is 5 GB iCloud storage enough?
For most users, no.
Modern iPhones with photos and videos usually exceed 5 GB quickly.
Can I use both iCloud and computer backup together?
Yes, and it’s actually recommended.
Using both provides stronger protection against data loss.
What happens if I never backup my iPhone?
If your iPhone gets damaged, lost, or reset, you may permanently lose your photos, messages, apps, and personal data.